Monday, February 16, 2015

Zeera Aaloo (Cumin Potatoes stir fry)

This is a great recipe for a quick dinner. There aren't many ingredients and doesn't take much time. It pairs great especially with stuffed breads or with rice as a side dish or when you are really not in a mood to cook but you are forced to do something with a jiffy.

He He . . . I am glad I had this recipe with me and it worked out wonderfully because it was loved by everyone when I dished it out. It is the quickest way to get a side dish at home and you will be called as the stir-fry Master when you dish it out. Surely when potatoes meet cumin, magic happens. Have a look at this recipe:


INGREDIENTS :
 
5-6 medium size potatoes, boiled
1 and half tsp cumin seeds/jeera
¼ cup chopped coriander leaves
1 green chili, chopped
½ tsp turmeric powder
¼ tsp red chili powder
3 to 4 tsp lemon juice
3 tbsp oil
Salt to taste

HOW TO MAKE:
 
1) Peel the boiled potatoes and cut into cubes.
 
2) Heat oil in a pan. Add the cumin seeds and let these sizzle in the oil.
 
3) Now add the green chilies and fry for a minute. Add the potato cubes and mix it well with the cumin seeds and chilies.
 
4) Sprinkle the turmeric powder, red chili powder and salt. Saute the potatoes for 2-3 minutes.
 
5)  Add the lemon juice and chopped coriander leaves. Mix the whole mixture well for a minute.
 
6) Serve hot.


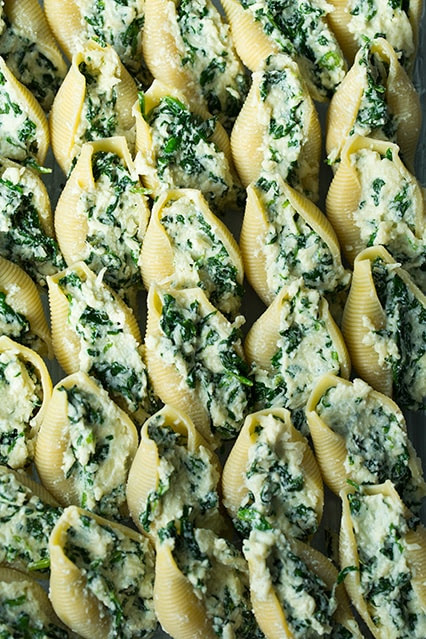
Spinach and Cheese Stuffed Shells

The weather has been great this year except for the fact that winter season never called for warm clothing all through the last couple of months. In fact we feel like we are going through spring and we had just one heavy rainfall a month back. We love to see rains here as everything changes here with one rain. Rainfall is so scanty here that several months pass by and we never see rainfall sometimes.

I have developed a sudden attraction to pasta these days and after looking for some good pasta recipes from my cookbook, I ended up marking this one and I don't remember from where I found it because I had bookmarked it ages back and I remember being obsessed by the pictures at that time thanks to its Italian touch.

One secret ingredient made this dish a pleasing affair - delicious pasta sauce. You can use a homemade or store bought one. Homemade pasta sauce mainly comprises of tomatoes, thyme, garlic powder, onion, oregano, crushed black pepper, salt and red chilli flakes.These are cooked together until they are reduced to sauce consistency.

I particularly loved the use of spinach with pasta. This combination made the pasta on the other side of fantastic . And then cheese spread liberally on the top and baked to get a crisp finish. The top layer gets a crisp crust and a fluffy texture on the inside. Bake in a rectangular or square dish for best results and to make dinner time special.

Overall a fabulous treat for a springy day.

INGREDIENTS:

30 jumbo pasta shells, cooked according to directions listed on package
1 bunch fresh spinach, steamed just until wilted, squeezed dry with paper towels and chopped
Mozarella Cheese to spread
1 large egg
1 1/2 Tbsp chopped fresh coriander leaves
1 tsp chopped fresh thyme
1 clove garlic, finely minced
3 cups  mozzarella cheese, finely shredded, divided
1 cup Parmesan cheese, finely shredded (optional)
Salt and freshly ground black pepper, to taste
3 cups pasta sauce, homemade or store-bought
Red pepper flakes


spinach and cheese stuffed shells | Cooking Classy
 

HOW TO MAKE:

1)  Preheat oven to 375 degrees. In a mixing bowl, using a fork, blend together cheese and egg. Stir in basil, thyme and garlic.

2) Add 2 cups mozzarella and Parmesan cheese and toss mixture to combine. Mix in prepared spinach. Season mixture with salt and pepper to taste. 

3) Spread 1/3 cup pasta sauce into an even layer along bottom of a 13 by 9-inch baking dish.

4) Divide cheese mixture among cooked pasta shells, stuffing each shell full with about 2 Tbsp cheese mixture.

5) Align shells in baking dish side by side, with the opening of shells facing upright. Stir red pepper flakes to taste into pasta sauce if desired.

6) Cover shells evenly with remaining pasta sauce then sprinkle tops evenly with remaining 1 cup mozzarella cheese.

7) Cover baking dish with aluminum foil and bake in preheated oven 30 minutes. Serve warm.


spinach and cheese stuffed shells | Cooking Classy

Sunday, February 15, 2015

Coffee Icecream

The weekend brought in not so good news for us. To our dismay, the Municipal authorities decided to replace water pipes all through the city during the 2 day break and that meant that we would not be having water for 2-3 days. So we were cautioned to make use of water wisely and avoid wastage so that out roof tanks do not run out of the stored water.
 
We were forced to reduce water usage and had to cut down on most of the weekend activities. But then, it all went smoothly and now as promised we have water flowing freely from our taps and we thank God for it.
 
Still we had our cooking work for the weekend and we avoided eating out particularly this week as even restaurants would not have water and we did not trust the hygiene levels for these days. So as usual I tried out new stuff for the dinners and desserts.
 
I had some coffee beans sitting in my pantry shelf. Luckily, neither me nor hubby are beverage lovers. So we do not have the habit of drinking tea nor coffee until and unless we really want to drink it. The coffee beans begged to be used in something and it had been a long time since we had ice cream.  Coffee Ice cream for the weekend? Or coffee Ice cream for Valentines Day? Either way it is the same because at the end of the day, we are the ones relishing it.
 
I had never used coffee beans before, but it was so worth it! This recipe is awesome! I've made it at least three times in the past month, because everybody just wants more. 

Tickle your tongue with clouds of decadent whipped coffee ice cream, nestled on top of buttery, flaky crust. You know you need to make this when you see the mocha dripping over ! A real slice of heaven in your mouth!!!

INGREDIENTS:
 
1 cup whole milk
3/4 cup granulated sugar
pinch of salt
2 cups heavy cream
1 tablespoon pure vanilla extract
1 cup whole coffee beans
 

HOW TO MAKE:


1) In a medium sized saucepan, whisk together the milk, sugar, salt, and cream. Stir in the coffee beans.

2) Heat on medium heat until mixture is quite warm, but not boiling. Remove from the heat, cover and let sit 1 hour. Strain through a fine mesh strainer and stir in the vanilla.

3)  Refrigerate for 4 hours, or up to overnight. Freeze according to your ice cream maker directions.


Pepper Tomato Chutney

Whenever we visit our nearby South Indian restaurant for quick and light dinners, we are treated with a Chutney as a side dish made up mainly of Tomatoes. Generally, I am not a fan of Chutneys and if they are made of coconut or are spicy, they are the last things I taste.
 
In India, Chutneys are those side dishes which have all their ingredients ground to a smooth paste and are used as dips with fries or pancakes or with steamed rice cakes. On a recent visit to the supermarket, I happened to pick a few red bell peppers with the intention of using it in salads or noodles. However, I chanced upon a recipe for a recipe which uses bell peppers along with tomatoes to form this chutney which pairs beautifully with our Idlis and pancakes.
 
The good news is that, it doesn't require coconut and that's why I decided to try it. However, the outcome was something I did not expect. It tasted exactly like the Chutneys that are served in our nearby restaurant and which I always wondered as to how they make it so deliciously. So this recipe automatically gets bookmarked to be tried again and again .

This fresh chutney is ready for the table so quick, you won't believe it's homemade until you taste it. Not so spicy, vibrant, and super fresh. That's the best kind of Chutney, whether it's a topping on a taco or a quick summer dip in the sun.


INGREDIENTS:
 
Red Bell Pepper - 1, chopped into 1" pieces
Tomatoes - 2 large, sliced
Chana dal - 1 1/2 tbsps
Dry red chilies - 2
Green chilies - 1
Cumin - 1 tsp
Coriander leaves - 2 tbsps
Salt to taste
Cooking oil - 1 1/2 tbsps.

For Seasoning:
  • OIl - 1 tsp
  • Mustard seeds - 1/2 tsp
  • Red chilies - 2
  • Curry leaves - a sprig
  • Asafoetida - pinch


HOW TO MAKE:
 
1) Heat 1 1/2 tsps of oil in a vessel. Once the oil is hot, reduce flame, add chana dal, cumin and red chilies and saute till the dal turns light brown. Add green chilies and coriander leaves and saute for 2 mts. Remove the contents from the vessel and keep aside to cool.

2) In the same vessel, add a tbsp of oil, add the red bell pepper pieces and saute for 6 mts. Add the tomatoes and saute for 9-10 mts on low to medium flame. Turn off heat and cool.

3) Blend the dal-red chilies mixture till coarse. Then add the cooled ingredients (tomatoes and red bell peppers) along with salt and grind to a fine paste. Remove into a serving bowl. 

4) Heat a tsp of oil in a small pan, add the mustard seeds and allow them to splutter. Add the curry leaves, red chilies and asafoetida and turn off heat.

5) Pour this tempering over the chutney and serve.


Thursday, February 12, 2015

Turkish meat balls

Happy Weekend Everyone.

Guess what I just realized . . . I had never posted a meatball recipe earlier. And it really is strange. Because we do make meat balls regularly, and after all those kebab and Non-vegetarian gravies that I have posted in the past, meatballs should have somehow made it to this space. Better late than Never!!!

On a recent dinner visit to a Turkish restaurant, we got a chance to taste the Turkish meat balls accompanied with Turkish bread  and some salad and Oh boy!!! we loved them to the core. Turkish cuisine makes use of simple spices and their dishes taste fabulous after just grilling or frying them. I did not see any rice item on their menu surprisingly even though I have eaten enough of Turkish regular food in the past since I used to work in a Turkish Company a few years back.

Turkish food is generally clean and always pared down to basics. If you stock up on some oregano, parsley and cumin, then you have the makings of everyday Turkish cuisine. It is neither overly spiced nor is it cumbersome to plate. It suits chilli-shy palates perfectly as it is mild and delicious.

Coming to the recipe:

INGREDIENTS:

750 grams minced meat (lamb/mutton or beef, a mixture works well)
2-3 onions, finely chopped
2 slices bread (without the crust)
1 whole egg
1/2 bunch of parsley  + ½ bunch of coriander leaves
1 teaspoon cumin powder
1 tablespoon ginger paste
½  teaspoon chilly powder or 2/3 green chillies chopped fine
 Salt to taste
2 tomatoes
Tomato ketchup-2 tablespoons
1 extra onion chopped fine (for frying)


HOW TO MAKE:

1) Put the minced meat in a large bowl.  Soak the slices of bread in water, and squeeze out excess water and crumble over the meat.

2) Then add in onions, egg, parsley/coriander and cumin powder. Knead well.  Scoop up lemon sized pieces of the mixture and roll them into balls.

3) Fry on a medium heat until nicely brown.

4) In a large non-stick pan,  add a little oil and brown the extra onion. 

5) Then add ginger/garlic paste and saute for sometime.  Add tomato and tomato paste and chilly powder -then add the meat-balls and saute till the meatballs are coated all over with the sauce. 

6) Garnish with extra coriander/parsley.

7) Serve hot.


Wednesday, February 11, 2015

Acahri Paneer Pulao

We usually like to make something special for our Friday lunch every week. Because Fridays for us is a sacred day, and it is mainly a family day for us since our weekend falls on a Friday.

Generally in most Muslim families here, Friday lunch is the family re-union time because we all assemble after our Friday prayers and have our meals together. Post meals we relax and then gear up to face the weekend evenings either outdoors or catching up with friends or shopping. Sometimes dining out also. They are the most relaxing evenings for the week.

That is why I am always looking for new rice dishes to try out for our Friday lunch. I usually accompany our rice dish with either salads, sea food or poultry or meat and sometimes eggs to make the meal look a bit elaborate.

Recently I tried out a Pickled dish to spice up our Friday menu with the big flavors of homemade Indian Pickle. Added cottage cheese to the pickle marinade to sober the flavors slightly. You can also use store-bought pickle for a more spicy flair.

The recipe doesn't call for frying the Cottage cheese cubes. Want it extra crispy? You can fry them if you like till it is golden brown, delicious, and as crispy as you want it!

For more variation, you can throw in some vegetables and fry them till crispy to make this dish look more colorful.

This basic, top-rated rice recipe is a great way to get started for a spicy weekend.

INGREDIENTS:

For The Achari Marinade:

1 1/4 cups paneer (cottagte cheese) cubes
1 tbsp oil
1 tsp mustard seeds
1/2 tsp fenugreek (methi) seeds
1 tsp cumin seeds
1 tsp nigella seeds (kalonji)
1 tsp fennel seeds (saunf)
1/4 tsp turmeric powder
1 tsp chilli powder
1/2 cup whisked curds
1 tbsp readymade green chilli pickle
 Salt to taste

Other Ingredients

3 cups cooked rice
1 tbsp oil
1 to 2 cinnamon sticks
2 cloves
1/2 tsp caraway seeds
2 cardamoms
Salt to taste

For The Garnish

1 tbsp finely chopped coriander leaves


HOW TO MAKE:                      

For the Achari paneer marinade:


1) Heat the oil in a kadhai, add the mustard seeds, fenugreek seeds, cumin seeds, nigella seeds and fennel seeds. 
2) When the seeds crackle, add the turmeric powder, chilli powder and switch off the flame. Add the curds and mix well.
 3) Add the green chilli pickle and salt and mix well.Add the paneer cubes, mix gently and keep aside to marinate for 30 minutes.

For the Rice:
 
1) Heat the oil in a non-stick pan, add the cinnamon, cloves, caraway seeds and cardamom

2) When the caraway seeds crackle, add the rice and salt, mix well and cook on medium flame for 1 minute, while stirring continuously. Add the marinated paneer, mix well and cook on a medium flame for 1 to 2 minutes, while stirring occasionally.

3) Serve hot garnished with coriander leaves.


Eggless Chocolate Walnut Brownie

The new entry into my Kitchen is the Electric Oven. Earlier I used a Convection mode Microwave oven which gave me very poor results for baking. That oven was very good only for grills and Microwaving. I still have it and I only added an electric oven that I can use for baking- it also has options for grilling, Rotisserie and heating as well.

With a long list of recipes bookmarked previously for baking, I am having a tough time to choose as to what needs to be tried out soon and what can wait for a while.

Now I am cooking a ton and spoiling everyone with new treats.

Cakes and Brownies for sure will be my first choice followed by Puff Pastries and Casseroles and cookies.

So I thought of taking it one at a time and gradually try out each one and I am not very keen to repeat the ones whose outcome is satisfactory. My idea seems more like a practicing baking class that I am conducting for my own self.  He He . . .  

Brownies were my first choice. I had all these ingredients at home that day. So I chose this recipe.

Brownies are different from cakes but they do have a few similarities.. They usually are more chocolaty and seem to be a hybrid version of a chocolate cake and a soft cookie, they are flat and have a kind of rough texture compared to normal cakes.

The outcome was quite good and I felt more like a master Chef after baking these brownies. My presentation looked like I had toiled over the dish forever.  I garnished it with  some chopped walnuts that I always stored in my Nuts box on my pantry Shelf.. You could also add a scoop of vanilla ice-cream to complete the medley of flavours. But trust me; you don’t really need the ice-cream.
Now get ready to shine a little fresh morning sun onto your meal with these fresh nuts topped brownies. Savor the sweet burst of chocolate with these brownie squares. The best bakes put the taste of the season right into your happy, happy mouth.

Diligently retesting the recipe as well, I listed down these ingredients for you and I suggest you try this soon.


INGREDIENTS:

Curd – 1 cup
Sugar – 3/4th cup
Baking powder – 1 1/2 tsp
Baking soda – 1 1/2 tsp
Flour – 1 cup
Cocoa powder – 1/2 cup
Vegetable oil – 1/2 cup
Vanilla essence – 1 tsp
Chopped walnuts – 1/2 cup

HOW TO MAKE:

1) Mix the curd and sugar till the sugar dissolves. Add baking powder and soda, mix and leave to rise for 10minutes.

2) Mix the flour and cocoa powder and keep it aside.

3) Add the oil and vanilla essence to the curd mixture and beat well. Add the walnuts and flour mixture, and fold well.

4) Pour on to a greased baking tray and bake for 30 minutes or so. You can check if it is done by piercing the centre of the cake with a toothpick or fork. It should come out clean.

5) Let the cake cool and serve with vanilla ice cream (optional).


Sunday, February 8, 2015

American Chopsuey

We finally bought a new Electric Oven and I feel pretty proud to see it sitting on my Kitchen top. I have a list of recipes waiting to be baked. I also shopped online for some bake ware and have increased my collection. Only the ingredients are waiting to be gathered and soon I have interesting plans to fill my house with this lovely aroma that drifts out from bakeries.

To be honest, its been years since I last baked a cake and can't stop myself from feeling a bit low while I browse through all the lovely bakes showcased on the blogosphere. From frosting the cake to decorating it, I have loved every bit of this cake making process and have a strong interest to try these pretty things all by myself.

That is why most of the time I work on dishes cooked on the stove top and grills. And to a large extent, I have been unknowingly mastering varieties of dishes that do not take more than an hour to prepare.

Off late, I have developed an urge to try out Non-Indian cuisines. Whenever we are dining outside, we are trying out new restaurants and in this way end up tasting Thai food and sometimes Turkish, Chinese,Omani, Lebanese, Mexican etc. In this way, I have explored various dishes from these cuisines and have been trying out regularly Non-Indian food in our house and we surely are loving it.

Generally, we are having special dinners on weekend nights. So it is then that I bookmark a dish and try it out depending on what we would like to eat - heavy or light dinner. Because weekends are a great time to strengthen family ties and nothing is more exciting than to incorporate fresh produce and convert it into crispy outputs that pair interesting flavors and colors. Light never really taste so good, but this surely is a zesty one and it peps up the greens enormously with a crispy splash of goodness.

The American Chopsuey really knows how to shine and make its way to the center table.
 
INGREDIENTS :

Egg noodles 1 packet
Chicken (boneless) 1 cup (optional)
Prawns 1 cup (optional)
Carrot (julien) 1
Capsicum (julien) 1
Onion (julien) 1
Green onion leaves 1/2 cup
Cabbage 1 cup
Egg 1 (half fry for garnish)
Oil 2 tbsp
Ketchup 4 tbsp
Salt 1/2 tsp
Stock 1/2 cup
Garlic (chopped) 1 tbsp
Vinegar 2 tbsp
White pepper 1/2 tsp
Corn flour 1 tbsp (dissolved into 2 tbsp water)
Chilli garlic sauce 3 tbsp
Sugar 2 tbsp
Chinese salt 1/2 tsp

HOW TO MAKE:

1) Boil noodles for 5 minutes, strain and dry.

2)  Deep fry noodles in batches till crisp and keep aside.

3)  In a large pan heat oil and saute chopped garlic.

4) Add capsicum, onion, onion leaves, cabbage and carrot with all seasonings and saute for 2 minutes.

5) Add chicken stock when start boil add dissolved cornflour. Stir continuously till thicken gravy.

6) Spread gravy over fried noodles in a platter. Top with fried egg and serve.


Wednesday, February 4, 2015

Chatka Tangdi Kebab/Grilled Chicken drumsticks

After a month of glorious holidays and having enjoyed enough family time, catching up with old friends and witnessing great weather, we are back with refreshed souls that are all set to face the day-to-day music of life.

In all honesty, we are so used to our busy lives that we actually missed our life here in Muscat. The main thing here is that we enjoy waiting for the weekends and then friends and cooking and shopping become the major highlights of the week. Sometimes, we just use the weekends for ourselves and sit back to relax and wipe away the fatigue out of our souls.

For me holidays were as good as holidays for the kitchen also. I did not try new recipes and thankfully I have a few more saved in my drafts to share here. And I am back with energy oozing out of every cell of mine and all set to try out a long list of cuisines bookmarked regularly. I do have some interesting ideas to make my blog more enterprising which I am keen to adopt soon before this year passes. Yes.... you guessed it right !!! It is one of my new year resolution!!!

Coming to the recipe ..... Another Kebab recipe for al the kebab lovers out there. Warm from the grill with a bit of butter, these simple, crispy treats get better with every bite. You'll never go back to those coffee shop grills again!

INGREDIENTS:

1kg  Chicken drumstick
1 tsp  Deggi mirch
1 tbsp  Ginger garlic paste
Salt to taste
2 tbsp Hung curd (Beaten)
2 tbsp Peanut (Roasted)
2 Green chilli (Chopped)
1 tbsp Lemon juice
1 tsp  Turmeric
2 tbsp Mustard oil
1 tsp Jeera powder(Roasted)
2 tbsp Sonth powder(optional) --- Sonth is dried ginger
1 tsp  Kasoori methi
1 tsp   Garam masala
1tsp   Coriander powder
10ml Lemon juice


HOW TO MAKE:

1)   Clean and wash the chicken drumstick on a clean chopping board then marinate first with salt, lemon juice and ginger garlic paste.

2)  Make paste of roasted peanut, Jeera, green chilli keep aside.

3)  For second marination put in a bowl peanut paste add Sonth chutney, Deggi mirch, coriander powder, kitchen king, garam masala, Kasoori Methi.

4)  Heat mustard oil in a pan, Put Deggi mirch and turmeric to slight hot oil to get released color of chilies and add into marination mixture to mix well.

5) Add the Chicken drumsticks into the ready marination and leave it for 2 hour under refrigeration.

6) Cook in tandoor/oven/grill in moderate temperature at 250 c for 15 min until crisp red color and get well done.

7) Serve with spiced onion and lemon wedges.

Wednesday, January 28, 2015

Cheesy corn balls

This morning we walked out of our homes to chilled-fresh air, wet roads, grey sky and drops of water scattered on the tree leaves. The after effects of some good rainfall that we witnessed last night. Now who can expect it to rain when yesterday was just another day with bright sunshine and good breeze? And all of a sudden the clouds darken the sky as the night falls and the rain comes pounding over even before we could stare out of the window all surprised?  The rain Gods have surely been eves-dropping this time I guess!!!

In our childhood days, rains were a welcome sign for all the spicy, mouth watering dishes that would get cooked in the traditional way. Sometimes our elders would use earthern pots made from local red clay, and firewood to impart a smoky flavor to dishes and give it that cold wet day's feel to the food.

From fritters to Kebabs, warm soups to French fries, hot food never fails to impress anyone on a cold rainy day. But over the years, cooking styles have evolved and traditional methods have been gradually replaced by modern, gourmet creations. And so is our style for a rainy day's choice -  Cheesy Corn Balls.

Crunchy from outside and cheesy from inside, this is a delight to eat. It includes a mountain of cheese types which melt incredibly with every bite filling in a whole amount of goodness through your soul.

Lets hit the recipe now

INGREDIENTS:

1/2 cup Parmesan Cheese, grated
1/2 cup Mozzarella Cheese, grated
1/4 cup Cheddar, grated
1/4 cup All purpose flour
1 big boiled Potato
1/2 cup Corn
2 Green chilies, finely chopped
2 tbsp Cornflour
1/2 cup Breadcrumbs
1/2 tsp Oregano powder
Salt to taste
Freshly grounded Pepper powder
Oil for frying


HOW TO MAKE:


1) In a mixing bowl put all varieties of cheese and mix with a fork. Add pepper powder and salt to taste and mix thoroughly.

2) In a mixer grinder take corn and grind to a coarse paste. 

3) Take another bowl and knead the boiled potato, corn, oregano along with all purpose flour and sprinkle some salt again. Now add the cheese mixture to it and make small balls of same size.

4) Make a paste of cornflour with 2-3 tsp water, dip the balls in the cornflour paste and coat with breadcrumbs, shaking off the excess and place them in dry plate.

5) In a large deep frying pan, heat oil and fry them in small batches till golden brown for 2 minutes.

6) Serve them hot with mayo or Ketchup.


You may also like:

Related Posts Plugin for WordPress, Blogger...