Wednesday, February 25, 2015

Soya Pulao

We had  a very puzzling weather last weekend. Terribly windy but no rain. Even though clouds gathered up in the sky,they just could not bring in rain for us. The seas were rough and unstable. But then at least the temperatures dropped. We are now enjoying cool days from the balmy days that we had a few days back. The heat started to slow us down and then came this respite. And we have rains forecasted for the next weekend. That's a good news for us. Many people sneak out to parks to enjoy the fresh weather in the evenings now.

This is a long pending post. Lying in my drafts since ages. So I decided to make it again and then post it.  And I was finally able to make it last weekend for lunch. With some salad and yogurt, it served as a very healthy meal.


INGREDIENTS:

1 cup rice
1/2  cup dried soya chunks – washed and boiled in water till soft
2  tbsp Ghee/clarified butter
1 tsp  cumin seeds
2 bay leaves
1 big onion finely sliced
1/2 tbsp grated ginger
3 green chillies slit length wise
1/2 cup chopped mixed vegetables like beans, green peas, carrots or potatoes
½ tsp turmeric powder
Salt to taste
3 tbsps of fresh mint leaves
1 cup of freshly extracted coconut milk
2  cups water
2 tbsps lemon juice
Fresh coriander leaves for garnish
8-10 cashewnuts (lightly roasted in ghee till golden brown)


For Spice Powder

1 green cardamoms
2 cloves
2” cinnamom stick
3-4 pepper corns
1 tsp coriander seeds
1/2 tsp cumin seeds
1-2 dry red chillis

HOW TO MAKE:

1) Lightly dry roast in a pan  all the ingredients for the spice powder and grind to a fine powder. Keep it aside.
 
2) Heat ghee in a heavy bottomed vessel. Add cumin seeds and bay leaves, then add the sliced onions, grated ginger and green chillis. Saute the onions till they turn pink.

3) Add the mixed vegetables and on medium heat, let them cook. Add salt and cook for 3-4 minutes.

4)  Add turmeric powder and the spice powder and combine well. Stir fry for a minute.

5) Add the cooked soya chunks and the mint leaves and combine. Cook for 2 minutes.

6) Add the coconut milk, let it come to a boil, reduce heat and add the water. Bring to a boil again.

7) Add the rice and mix well. Add salt, if required, at this stage. Reduce heat to medium and let it cook covered with lid till the rice is done.

8) Garnish with the lemon juice, fried cashew nuts and fresh coriander leaves. Serve hot.
 

Red Velvet cake

What's the only thing better than walking through the door and smelling fresh cake being baked? That's right: eating it!

I am not much of a baker but I absolutely loved the experience last weekend when baking was the highlight of it.  I loved this recipe and I knew I will be making it ! Dense, moist goodness! Made two cakes out of this recipe and sandwiched them with whipped cream frosting. This is one of the most decadent cakes I've ever made.

Cakes don't need to be sculptures to be delicious! This was my first attempt with so many cakes all in a day and my house smelled like a busy bakery that day. I took these cakes to work the next morning and it was a hit. I could have done better, but still everyone loved them.

So break out a regular, great-tasting cake for your next get-together and wait for the compliments to come rolling in. Finish that delicious cake with a great frosting. It's easier than you think.


INGREDIENTS:

2 cups All Purpose Flour
1 cup Sugar
1/4 cup Unsalted Butter
1/4 cup Oil
2 Eggs
2 tbsp  Cocoa Power
1.5 tbsp Red Food Colouring
1 cup Buttermilk
1 tsp Baking Soda
1 tbsp Vinegar (white)
1 tsp Vanilla Essence
1/2 tsp Salt
Whipped cream frosting - 1 tin (I used a readymade one)
 
HOW TO MAKE:
1) Preheat oven to 180 degree C. Take cocoa, food colouring powder, 1/4 cup of buttermilk and mix to a paste. Set aside.
2) Now take butter, oil, sugar, vanilla in a large bowl, Use a electric beater to cream this up. Add in eggs and cream again. Add in the cocoa-food color mix and mix well. 
 
3) Add in flour, salt, buttermilk and fold gently.
 
4) Now take baking soda in a bowl, add in vinegar. It will bubble up. pour this into the batter and mix gently. This will lighten the batter.

5) Divide this between 2 cake pans and bake for 25 to 30 mins.

6)  Cool the cakes and spread frosting between each layer of cake, sandwich the cakes, spread frosting all around the sides and serve.
 
7) I had some crushed nuts and I mixed it with the frosting while covering the cake.

Tuesday, February 24, 2015

Honey Coconut cake

Honey coconut cake was an unusual combo that I chose after I chanced upon a honey cake recipe somewhere on the web. It was the third cake that I baked for the weekend baking special session and I felt officially like a Master Baker once the cake was popped into the oven. I personally don't like honey in cakes, but, I mean, I just went onto to see how it works out and this is totally the best honey cake ever!      

Nothing says love like honey, especially when it's baked in a "coconutty" cake. It's sinfully rich with a delightfully sweet flavor. You'll be amazed how a little coconut really brings out the sweet flavor in these cakes. This top-rated recipe is a breeze to make with fresh coconut. Sooooo good!

Simply the best cake I've ever had! It was gorgeous and delicious and stunning for dessert. You can also use different flavours or purees as per the availability if you are not very keen on this combo.  I topped the cake liberally with grated dessicated coconut  and also used coconut liberally inside the cake.       

INGREDIENTS:
 
For Cake:
 
1 cup All purpose flour
1/2 cup sugar
1tsp vanilla essence
100 gms unsalted butter
1 1/2 tsp baking powder
1/4 tsp salt
2 eggs
2-3 tbsp milk
1/2 cup coconut


For Syrup:
 
3/4 cup water
1/2 cup honey
1/4 cup dessicated coconut grated


HOW TO MAKE:
 
1) Preheat oven to 180 degree C. Take a baking pan and butter it well

 2) Take butter, sugar in a bowl and use a beater to whip till creamy.


 3) Add in one egg at a time and beat till fluffy and light.


4) Add in vanilla and then flour, baking powder and salt. Fold gently.


5) Add milk and fold gently.


6) Pour this into a prepared cake pan and bake for 35 to 40 mins or untill a tooth pick inserted comes out clean.


7) Remove it from oven and let it cool for few minutes.

For the Syrup:
 
1) Take honey, water and coconut in a sauce pan and bring it to boil, simmer it for 5 mins. Remove from heat and keep aside to cool for 5 minutes.

 2) Now use a toothpick to make holes over the cake. Pour the syrup over cake and chill this for an hour before serving.


Angel Food cake

Cooking is fun for sure but the joy is really in sharing your creation and serving people by putting your best foot forward. On my recent weekend baking spree, I chose to bake a simple chocolate cake with a simple frosting and ended up serving it to a small group of my colleagues at the workplace the next day. It was a welcome break for everyone from a busy loaded work day to see everyone relishing homemade bakes which eventually created a flow of gratitude and compliments as they enjoyed it.

This recipe will make even the most finicky Dessert eater a lover of sweets. The cake for sure is light and fluffy with loads of chocolate flavor – in fact the Chocolaty flavor is definitely mellowed. The cake is deliciously soft and moist and the type of fat used is unsalted butter at room temperature. However I also happened to read that oil also can be used in this recipe so that the softness and moisture is retained even when the cake is refrigerated. So don't be shy to make it in your own way. It is a lovely cake and the margin of errors is almost nil.

Now off to the recipe :

INGREDIENTS:

2 cups sugar
245 grams all-purpose flour
3/4 cup unsweetened cocoa powder
1 1/2 teaspoons baking powder
1 1/2 teaspoons baking soda
1/2 teaspoon salt
2 large eggs
1 cup milk
1/2 cup unsalted butter        
1 1/2 teaspoons vanilla essence
 
Chocolate Frosting:
 
1 small can puck cream (plain flavored Danish cream with about 20% fat)
1/2 cup chocolate syrup
 
HOW TO MAKE:
 
1) In a large bowl whisk together the sugar, flour, cocoa powder, baking powder, baking soda, and salt.
 
2) In another large bowl, cream unslated butter till soft and creamy. Then add sugar and continue to cream until the sugar has dissolved at least half. You can use a beater or a whisk for this process.
 
3) Add in eggs one at a time and  whisk together . Then add the milk and  vanilla extract. Beat until all the sugar is dissolved and the batter is creamy and fluffy (about 5 minutes)
 
4) Add the wet ingredients to the dry ingredients and stir, or whisk, until combined.

5) Bake in a preheated oven at 180 degrees Celsius until a toothpick inserted comes out clean.
 
6) Cool the cake and then frost it.
 
Frosting:
 
1) Whisk together the puck cream and chocolate syrup until creamy.
 
2) Spread it evenly on the top of the baked chocolate cake and enjoy.


Monday, February 23, 2015

Strawberry Cupcakes

Last weekend was a baking special one for us with the new oven busy to the core. I suddenly felt that I should really bake my heart out and was up at an early hour to start it . I was organized a day earlier with the plans chalked out and ingredients collected and de-frozen a night earlier. Next morning I set to work on the batters and in no time various cakes and savories were going one by one inside my oven for aromatic outputs. So this week's posts will be focused on my baking experiences of the weekend.
 
My first choice was the strawberry cupcakes. I had some fresh strawberries in my refrigerator waiting for attention. So I had to turn these sweet strawberries into must-have desserts for the whole family, or dress them up in easy, delicious cakes.


No other fruit shout spring like these sweet, delectable strawberries  My family loves snacking on the delicately crunchy and juicy flesh of this pretty pink fruit. It is a rich pack its share of nutritional punch including several anti-oxidants too. Did you know this fruit is budget friendly especially during winter? So I buy it regularly during these days and try to make as many desserts and salads with it as possible.

 
So now you can bring on the explosion of tart/sweet juiciness by giving these strawberries a crunchy topping, a cushion of cobbler, or a blanket of flaky pastry. It doesn't get better, or easier, than a dessert or a cake that calls for berries and bakes up beautifully every time.


Another thing to note is that these cupcakes are just not plain pretty cupcakes. They have bite-sized strawberry pieces mixed in them that give you a heavenly feeling with every bite. I did not add any color in the batter because the strawberry puree gives it a pretty pink color on its own.
 
And now the recipe.
 
INGREDIENTS:
 
1/2 cup  unsalted butter, at room temperature
2 large eggs, lightly beaten

1 teaspoon  pure vanilla extract

1 cup strawberry puree

1 cup fresh strawberries (cut into bite sized pieces)

2 1/4 cups all-purpose flour
3/4 cup light sugar
1 1/2 teaspoons baking powder
1/4 teaspoon baking soda
1/2 teaspoon salt
HOW TO MAKE:
 
1)  Preheat oven to 180 degrees Celsius.
 
2) In a medium sized bowl, whisk together the eggs, vanilla essence and strawberry puree. Add the melted butter and stir to combine.
 
3) In another large bowl combine the flour, sugar, baking powder, baking soda  and salt. Gently fold in the berries, making sure they are coated with flour. (This helps to prevent the berries from sinking during baking.) 
 
4) Add the wet ingredients to the dry ingredients and stir only until the ingredients are just combined. Do not over mix the batter or tough cakes will result. 
 
5) Divide the batter evenly among the 12 cupcake cases.
 
6)  Place in the oven and bake until a tester inserted in the center of a cupcake comes out clean, about 20 to 25 minutes.
 
7) Transfer to a wire rack to cool. Can be stored for a few days at room temperature.


Thursday, February 19, 2015

Mexican Salsa

When we had been to Dubai a few months back, we had some lip-smacking Arabian food. I was surprised when I saw Arabian Rice paired with a tomato dip which is totally like a Mexican Salsa. I had not tasted a Mexican Salsa earlier to that. But I just knew how it is made and I could at least predict its taste.

When I ate it, I loved it. And then I started making it often at home with Biryani and Kebabs. It can be made in a jiffy and the only thing you need to balance in it is the spicy and the sour content. This easy winter dip goes well with burgers, hotdogs, chops and all your BBQ faves. So now you can kick-start every weekend  with backyard barbeques and picnics in the park.

Easy is an understatement with the availability of ingredients and how quick it is to prepare. Seven ingredients are all you need for these easy and no-fat main dishes. Cumin is a key ingredient for tasty salsa.

INGREDIENTS:

3 medium sized tomatoes seeded and chopped

Juice of 1/2 lime

2 tbsp of finely chopped red onion

1 tbsp extra virgin olive oil

Salt to taste

1/4 tsp ground cumin

1 tbsp chopped cilantro/coriander leaves

1 finely chopped jalepeno pepper or green chilly


HOW TO MAKE:

1)  Mix all ingredients and pulse them for 2-3 seconds in a blender until it gives a coarsely ground sauce kind of a look.

2) Refrigerate for at least an hour before serving to allow flavors settle or until ready to serve.  


Wednesday, February 18, 2015

Methi Thepla

I sometimes spend a small part of my evenings watching a comedy soap related to simple day to day life of a society which houses several families and the way they all join in and solve simple problems. The stories they put up are very simple and sweet. I enjoy them and de-stress myself easily while I watch them.

It is basically a Gujarathi (Gujarat is a state in India) Production and it is here that I ended up hearing about flat breads made up mainly of fenugreek leaves. Interesting !!! So I had to see what it is. The pictures looked very appetizing and obviously it attracted my attention.

With a touch of fenugreek leaves and some gram flour, these flatbreads are cozy, bright, and so aromatic. Like most of my Gujarathi colleagues taught me, adding a little bit of gram flour and some fenugreek to their dishes is the key to authentic flavor. Their foods taste great and most of them are pure vegans - they also do not consume onions and garlic in any of their cuisines.

 In spite of all this, have you ever wondered what makes this cuisine taste so good? Chances are there are pinches of subtle spices and dried herbs in each dish.

The dish I am talking about here is the quintessential Gujarathi dish called Methi Thepla or fenugreek flat breads. The gram flour is cozy and the fenugreek is fresh. Just an incredible combination. It is rich in flavor and great for weekday dinners.

INGREDIENTS:

1 cup methi leaves/fenugreek leaves
1 cup whole wheat flour
3/4 cup besan/gram flour
1 to 1.5 tsp ginger + green chili paste
½ tsp red chili powder
½ tsp turmeric powder
½ tsp cumin powder
½ tsp coriander powder
¾ tsp salt or add as required
1 tbsp oil
4 to 5 tbsp yogurt or water for kneading or add as required
Oil for roasting theplas, as required
 
HOW TO MAKE:
 
1) Mix whole wheat flour, gram flour, all the spices and herbs and the methi leaves together with water or curds and knead into a dough and keep aside for an hour or so.
 
2)  After that make medium sized balls from the dough and roll each ball into flat breads of 5-6 inches in diameter.
 
3) Roast them on a flat pan or tawa one by one sprinkling oil occasionally until both the sides are cooked with a few black spots on both sides.
 
4) Serve the theplas with vegetable pickle or yogurt.


Tuesday, February 17, 2015

Stuffed Quesadillas with Onion Relish

I have been seeing a lot of Mexican foods gaining popularity in India now. I happened to develop this sudden interest for Mexican food after I had some nachos and tacos in a fast food joint recently. When I went through Mexican cuisine, I realized that they use very similar ingredients like Indian cuisine and they all happen to be available in our kitchens generally. For example, the tortilla is so very similar to our Indian Roti(bread) and tortillas are used in most of the Mexican dishes.
 
This built more interest in me and now I have invited Mexico into my kitchen as well. In most of the Mexican dishes I have been reading about here, you’re usually finding tortilla chips and salsa, but the salsa turns out to be a tomato sauce that has flavors of cumin and lemon juice. Also there are different types of salsas made of various peppers available to spice up your meat, tacos, and whatever else you are eating. They can be very hot and they do not make of any herbs, although you could add some like cumin or Mexican oregano  for those zesty flavors.
And then their soups and sauces. Off late, I have become a sucker for them. I am looking for a nice Mexican restaurant here so that we can enjoy real Mexican food occasionally. I am obsessed with their Enchildas and Fajitas. And soon they will also make it to this space as well.
 
To begin with, I tried out their stuffed pizza or Quesadillas. I enjoyed them . What do you say about a chicken pizza—a stuffed bread resembling a pizza but made with classic white meat?  If you feel like munching a pizza and you do not have pizza bases with you, then use your flat breads as described below and call them stuffed pizzas or Quesedillas.
 
Although, they are as good as our Indian stuffed parathas, the combination of cheese with colourful peppers and olives is what that made it totally Mexican. I also found an onion relish recipe to use as a side dish with the quesedillas.

So gather the right ingredients, and your favorite Mexican dishes are a snap to make—and super tasty, too!
 
INGREDIENTS:
(For both the quesedillas and onion relish)

80-90g boneless boiled chicken
1/2 a slice of red and green bell peppers
1 onion, cut into slices
5 tbsp of processed cheese
Salt to taste
1/4 cup of orange juice
1 tsp of black pepper
2 green chillies
2 olives
All purpose flour roti/tortilla

HOW TO MAKE:
 
For the stuffing:
  1. Slice the red and green peppers, chillies, olives and slices of boiled boneless chicken.
  2. On one side of the roti place the sliced peppers, sliced green chillies, sliced olives, slices of boiled chicken and top it with grated cheese.
  3. Fold the other side of the roti and envelope the stuffing, creating a pocket.
  4. Press the stuffing once covered to pack it.
  5. On a medium high flame, heat the pan for 2-3 mins.
  6. Place it on the heated pan.
  7. Cook the pizza pocket on both sides for a minute each.
  8. Once the cheese starts melting, the pizza pocket is ready.
  9. Once ready cut it into 3 triangles.
  10. Serve the stuffed pizza (quesadillas) with the onion relish

How to Make Stuffed Pizza or Quesadillas Video
    For the onion relish:
     
  1. Grind 1 tsp of whole black pepper
  2. Take a whole onion, chop into circular slices, add ground black pepper, salt according to taste and 1/4 cup orange juice
  3. Stir everything well
  4. Chill for an hour before serving


Monday, February 16, 2015

Zeera Aaloo (Cumin Potatoes stir fry)

This is a great recipe for a quick dinner. There aren't many ingredients and doesn't take much time. It pairs great especially with stuffed breads or with rice as a side dish or when you are really not in a mood to cook but you are forced to do something with a jiffy.

He He . . . I am glad I had this recipe with me and it worked out wonderfully because it was loved by everyone when I dished it out. It is the quickest way to get a side dish at home and you will be called as the stir-fry Master when you dish it out. Surely when potatoes meet cumin, magic happens. Have a look at this recipe:


INGREDIENTS :
 
5-6 medium size potatoes, boiled
1 and half tsp cumin seeds/jeera
¼ cup chopped coriander leaves
1 green chili, chopped
½ tsp turmeric powder
¼ tsp red chili powder
3 to 4 tsp lemon juice
3 tbsp oil
Salt to taste

HOW TO MAKE:
 
1) Peel the boiled potatoes and cut into cubes.
 
2) Heat oil in a pan. Add the cumin seeds and let these sizzle in the oil.
 
3) Now add the green chilies and fry for a minute. Add the potato cubes and mix it well with the cumin seeds and chilies.
 
4) Sprinkle the turmeric powder, red chili powder and salt. Saute the potatoes for 2-3 minutes.
 
5)  Add the lemon juice and chopped coriander leaves. Mix the whole mixture well for a minute.
 
6) Serve hot.


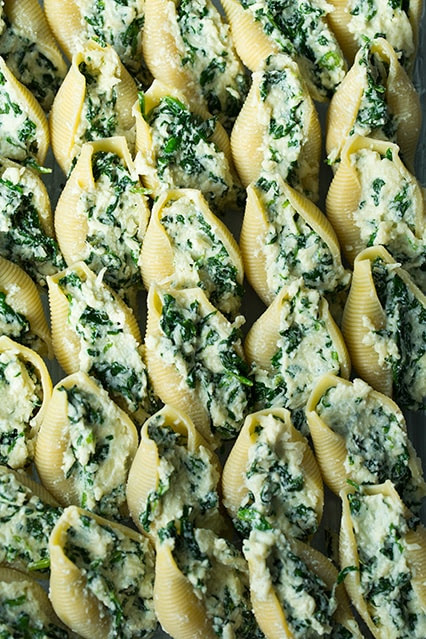
Spinach and Cheese Stuffed Shells

The weather has been great this year except for the fact that winter season never called for warm clothing all through the last couple of months. In fact we feel like we are going through spring and we had just one heavy rainfall a month back. We love to see rains here as everything changes here with one rain. Rainfall is so scanty here that several months pass by and we never see rainfall sometimes.

I have developed a sudden attraction to pasta these days and after looking for some good pasta recipes from my cookbook, I ended up marking this one and I don't remember from where I found it because I had bookmarked it ages back and I remember being obsessed by the pictures at that time thanks to its Italian touch.

One secret ingredient made this dish a pleasing affair - delicious pasta sauce. You can use a homemade or store bought one. Homemade pasta sauce mainly comprises of tomatoes, thyme, garlic powder, onion, oregano, crushed black pepper, salt and red chilli flakes.These are cooked together until they are reduced to sauce consistency.

I particularly loved the use of spinach with pasta. This combination made the pasta on the other side of fantastic . And then cheese spread liberally on the top and baked to get a crisp finish. The top layer gets a crisp crust and a fluffy texture on the inside. Bake in a rectangular or square dish for best results and to make dinner time special.

Overall a fabulous treat for a springy day.

INGREDIENTS:

30 jumbo pasta shells, cooked according to directions listed on package
1 bunch fresh spinach, steamed just until wilted, squeezed dry with paper towels and chopped
Mozarella Cheese to spread
1 large egg
1 1/2 Tbsp chopped fresh coriander leaves
1 tsp chopped fresh thyme
1 clove garlic, finely minced
3 cups  mozzarella cheese, finely shredded, divided
1 cup Parmesan cheese, finely shredded (optional)
Salt and freshly ground black pepper, to taste
3 cups pasta sauce, homemade or store-bought
Red pepper flakes


spinach and cheese stuffed shells | Cooking Classy
 

HOW TO MAKE:

1)  Preheat oven to 375 degrees. In a mixing bowl, using a fork, blend together cheese and egg. Stir in basil, thyme and garlic.

2) Add 2 cups mozzarella and Parmesan cheese and toss mixture to combine. Mix in prepared spinach. Season mixture with salt and pepper to taste. 

3) Spread 1/3 cup pasta sauce into an even layer along bottom of a 13 by 9-inch baking dish.

4) Divide cheese mixture among cooked pasta shells, stuffing each shell full with about 2 Tbsp cheese mixture.

5) Align shells in baking dish side by side, with the opening of shells facing upright. Stir red pepper flakes to taste into pasta sauce if desired.

6) Cover shells evenly with remaining pasta sauce then sprinkle tops evenly with remaining 1 cup mozzarella cheese.

7) Cover baking dish with aluminum foil and bake in preheated oven 30 minutes. Serve warm.


spinach and cheese stuffed shells | Cooking Classy

You may also like:

Related Posts Plugin for WordPress, Blogger...